Move and Transform
You can move layers and selected pixels with the Operation tool, and scale, rotate, skew, distort or warp them with Transform.
Operation tool
Do one of the following:
- Open a layer’s menu in the Layers panel and choose Move layer / mask.
- Press O.
- In Paint and Photo, select Operation / Transform in the Tools toolbar. Right-click or hold the button to choose Operation.
- Type “Operation” in command search.
Sketch has no Operation button.
Moving layers
With no selection, drag on the canvas to move the selected layers. Arrow keys nudge them by 1 px, and by 10 px with Shift.
You can’t move a locked layer.
Moving selected pixels
With a selection, drag to move the selected pixels of the active paint layer, in whole-pixel steps. While you edit a mask, Operation moves the mask.
With guides shown, Operation also selects and drags guides (see Rulers and guides).
Leave Copy
You can move a copy of the selected pixels and keep the originals in place.
Turn on Leave Copy in the Tool panel, or on the selection bar. Hold Alt as you start dragging to do the opposite for one drag.
Transform
Do one of the following:
- Choose Edit > Transform.
- Press Ctrl+T.
- Select Transform in the Commands toolbar in Paint and Photo, or in the title bar in Sketch.
- Select Transform on the selection bar.
- In Paint and Photo, right-click or hold Operation / Transform in the Tools toolbar and choose Transform.
With a selection, Transform changes the selected pixels of the active layer or mask. Without one, it changes the selected layers. A box with handles and the canvas bar appear.
To finish, select Apply or press Enter. Cancel or Escape discards the transform, and so does Undo while you transform layers.
To transform several layers, clear the selection first.
Handles
In Free and Uniform:
- Drag inside the box to move it. Hold Shift to move only horizontally or vertically.
- Drag a corner or edge handle to scale from the opposite side. Hold Shift to keep proportions, or Alt to scale about the pivot.
- Hold Ctrl and drag an edge handle to skew, up to 85°.
- Drag the handle above the top edge to rotate about the pivot. Hold Shift for 15° steps.
- Drag the pivot to move it.
In Distort:
- Drag a corner to move it on its own, or an edge handle to move that edge.
- Hold Shift on a corner to mirror the move on the neighboring corner, for symmetric perspective.
In Warp:
- Drag the mesh points, and the tangent handles of the selected point.
- Shift-click points to move several together.
In every mode:
- Arrow keys nudge the box by 1 px, and by 10 px with Shift.
- On a touch screen, a finger on a handle or inside the box drags it. A finger elsewhere moves the view.
Transform bar
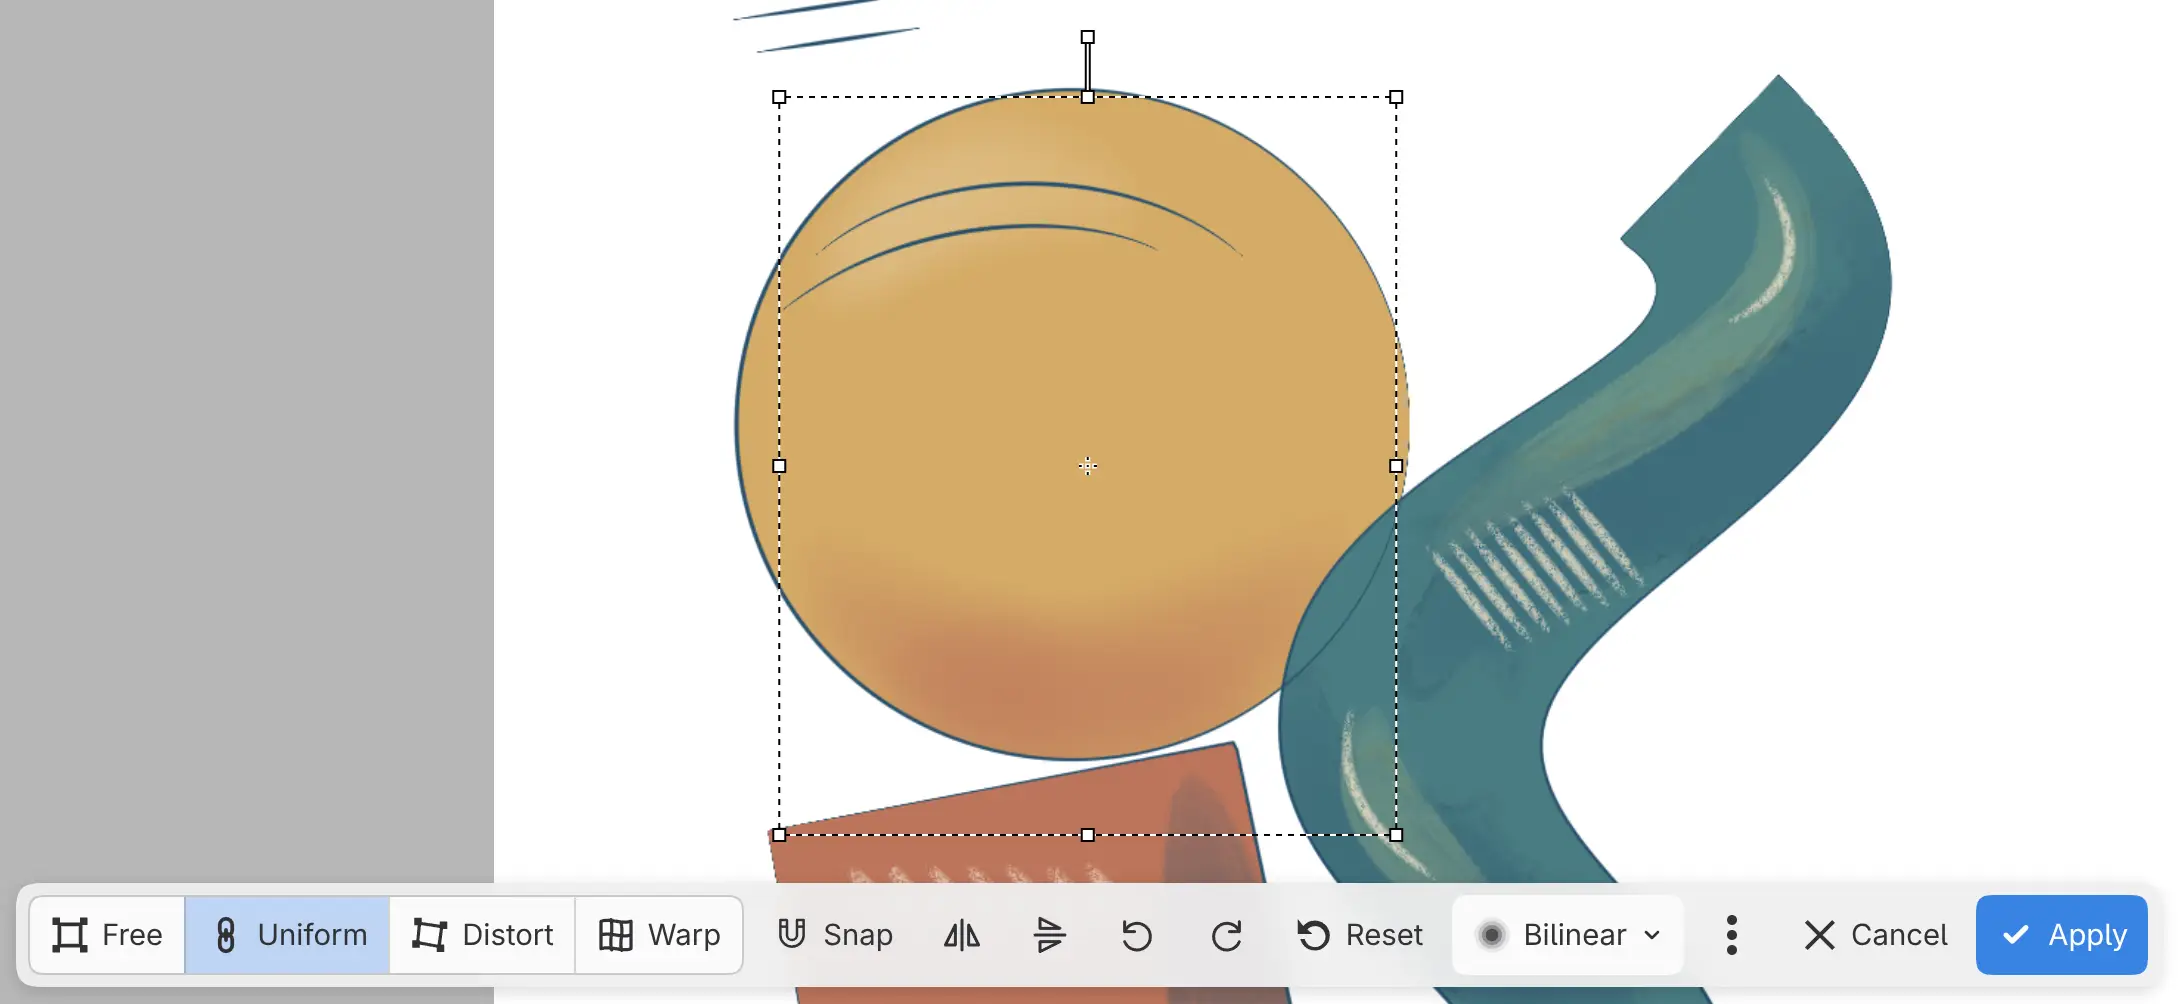
Mode
Free, Uniform, Distort or Warp. Uniform keeps proportions. Layer transforms open in Uniform.
Original Size
Returns a placed photo to 100%. Only for photos without Distort or Warp.
Snap
Snaps the edges and center of the box to the canvas, to other visible layers and to guides. Rotation doesn’t snap. Off by default.
Perspective
With Distort, mirrors each corner drag onto the neighboring corner.
Warp grid
With Warp:
- Split Grid: choose Split Vertically, Split Horizontally or Split Crosswise, then tap the warp to add a grid line there without changing the shape. Escape cancels the split. A grid holds up to 32 cells in each direction.
- Select Points: tap points to select them and move them together.
- Reset Grid: replaces the warp with a straight grid.
- Grid: 3 × 3 (the default), 4 × 4 or 5 × 5. Available until you change the shape.

Flip and turn buttons
The icon buttons Flip horizontally, Flip vertically, Rotate 90° left and Rotate 90° right mirror or turn the content about the pivot.
Reset
Undoes every change made in this transform and keeps it open. Mode returns to Free.
Interpolation
Sets how pixels are resampled: Nearest, Bilinear, Bicubic or Lanczos. Bilinear is the default in Free and Uniform, and Bicubic in Distort and Warp.
Transform values in the Tool panel
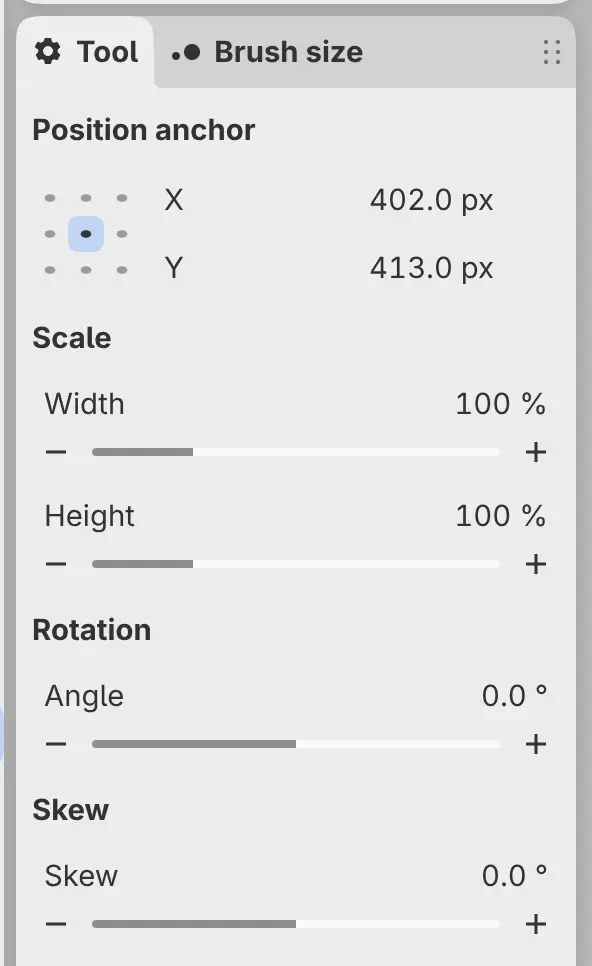
The Tool panel, and the Tool Options bar in Photo, show the values of an open transform, except in Warp.
- Position anchor: X and Y, in pixels, with the anchor grid above them that picks which point of the box they give.
- Scale: Width and Height, in percent. Uniform keeps them linked.
- Rotation: Angle, from −180° to 180°.
- Skew: Skew, from −85° to 85°.
Layer transforms
A transform of whole paint or photo layers is stored with each layer, and the pixels aren’t resampled. Transform opens again from the stored transform.
Until you apply the transform to the pixels, you can’t retouch a scaled or rotated layer, or paint on a distorted or warped one.
Apply Transform to Pixels
You can make a layer’s stored transform part of its pixels.
Do one of the following:
- Choose Edit > Apply Transform to Pixels.
- Choose Layer > Layer Settings > Apply Transform to Pixels.
While it works, a bar at the bottom of the canvas reads “Applying transform…” with Cancel.
Transform Again
With no selection, choose Edit > Transform Again to apply the last layer transform to the selected layers. Pastes, imports and transforms of selected pixels aren’t repeated.
Placed images
When you paste an image from another app or choose File > Import Image as Layer…, the image opens in the transform box. Apply places the image and Cancel removes the image. Until you choose one, other commands are unavailable.