Working with selections
You can change a selection, and the pixels inside it, from the Select menu and from the selection bar on the canvas.
The canvas bar
The canvas bar is a row of buttons on the canvas with the next steps for what you are editing.
| The canvas bar appears | Covered in |
|---|---|
| Beside a new selection | The selection bar, below |
| While you place the corners of a Polygonal lasso selection | Selection tools |
| In Quick Mask | Quick Mask |
| While you edit a selection layer | Selection layers |
| While you edit a layer’s mask | Masks |
| While you transform layers or pixels, or place an image | Move and Transform |
| While you crop | Crop |
| When you select a guide | Rulers and guides |
| When you click the clone source disc | Clone and heal |
| While you pick a sample point for Levels, Curves or White Balance | Adding and editing filters |
The bar sits beside the object, or at the bottom edge of the canvas. From left to right it has:
- A caption, such as “Quick Mask” or “Transform Outline”.
- The buttons. A dimmed button is unavailable; select it to see the reason.
- More, with the buttons that don’t fit, then the Select menu for a selection or the Layer menu for a mask.
- The button that finishes, such as Apply or Exit.
A bar beside an object hides while you touch the canvas or move the view.
To hide the canvas bar, do one of the following:
- Choose View > Show canvas action bar.
- Choose Show canvas action bar at the bottom of More.
Each workspace keeps its own setting. With the bar hidden, crops, transforms, placed images and polygons still show their finishing buttons at the bottom edge.
The selection bar
The selection bar appears beside a selection while a selection tool or Operation is active. With other tools it appears beside a new selection, but not beside one that Undo or Redo brings back. Brushes, the fill tools, Gradient and Figure never show the bar.

- Deselect and Invert: see the Select menu below.
- Leave Copy: with Operation only, see Move and Transform.
- Copy to Layer: Copy Selection to New Layer or Cut Selection to New Layer.
- Copy: Copy, Copy Merged or Cut, see Copy and paste.
- Transform: transforms the selected pixels.
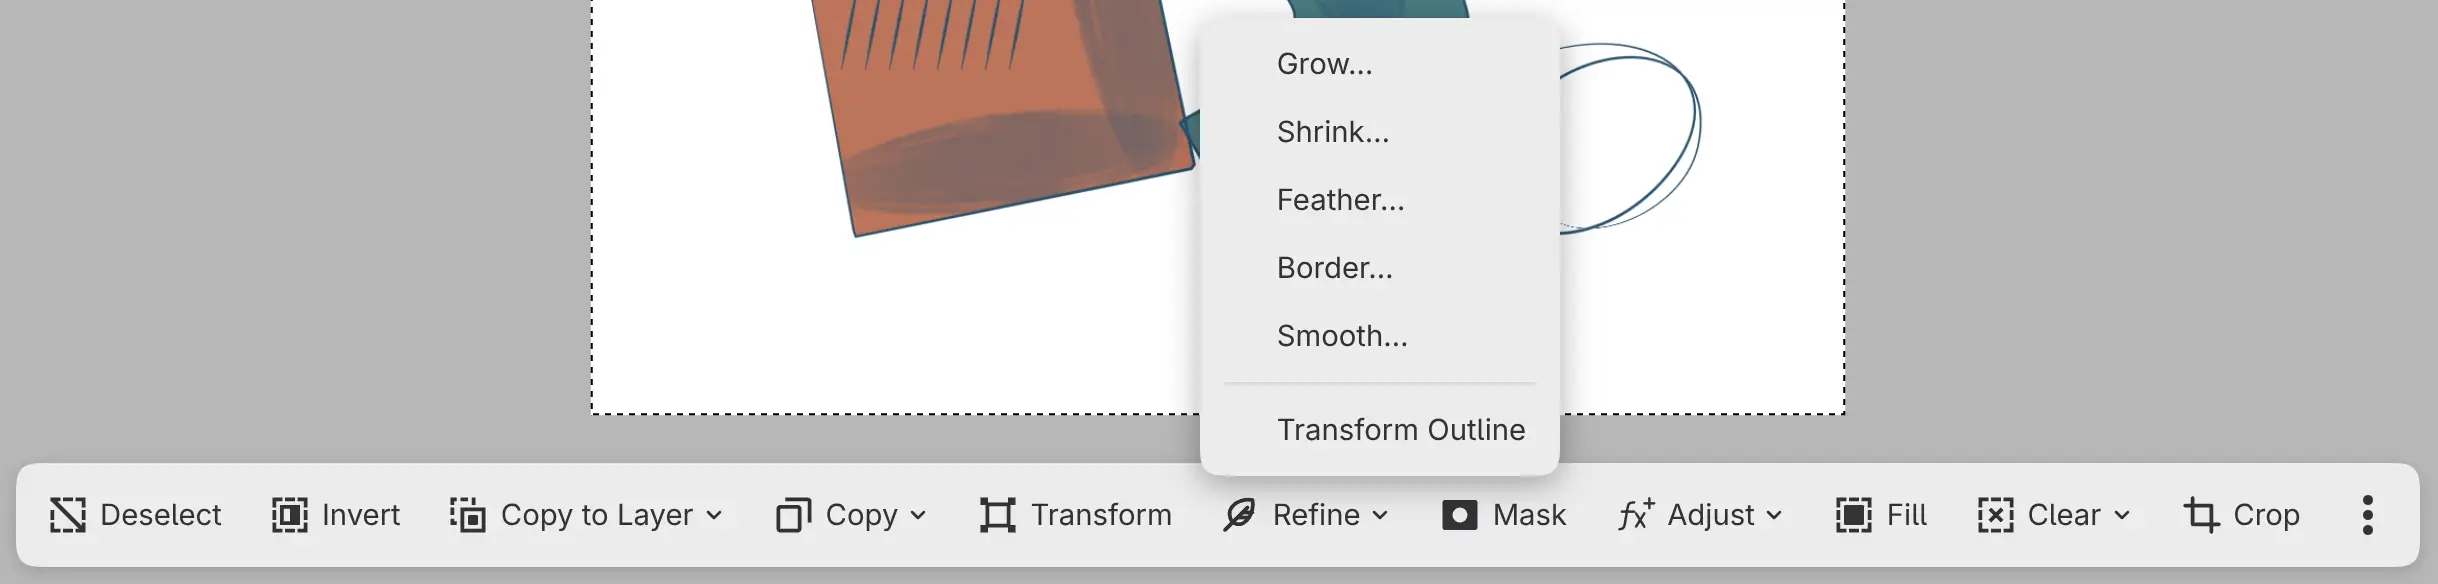
- Refine: the refine commands and Transform Outline.
- Mask: masks the active layer to the selection.
- Adjust: adds a filter that uses the selection as its mask, see How filters apply.
- Fill: Fill selection.
- Clear: Clear Selected Pixels or Clear Outside Selection.
- Crop: Crop Canvas to Selection, see Crop.
- Quick Mask: see Quick Mask.
- Save: Save as Selection Layer, see Selection layers.
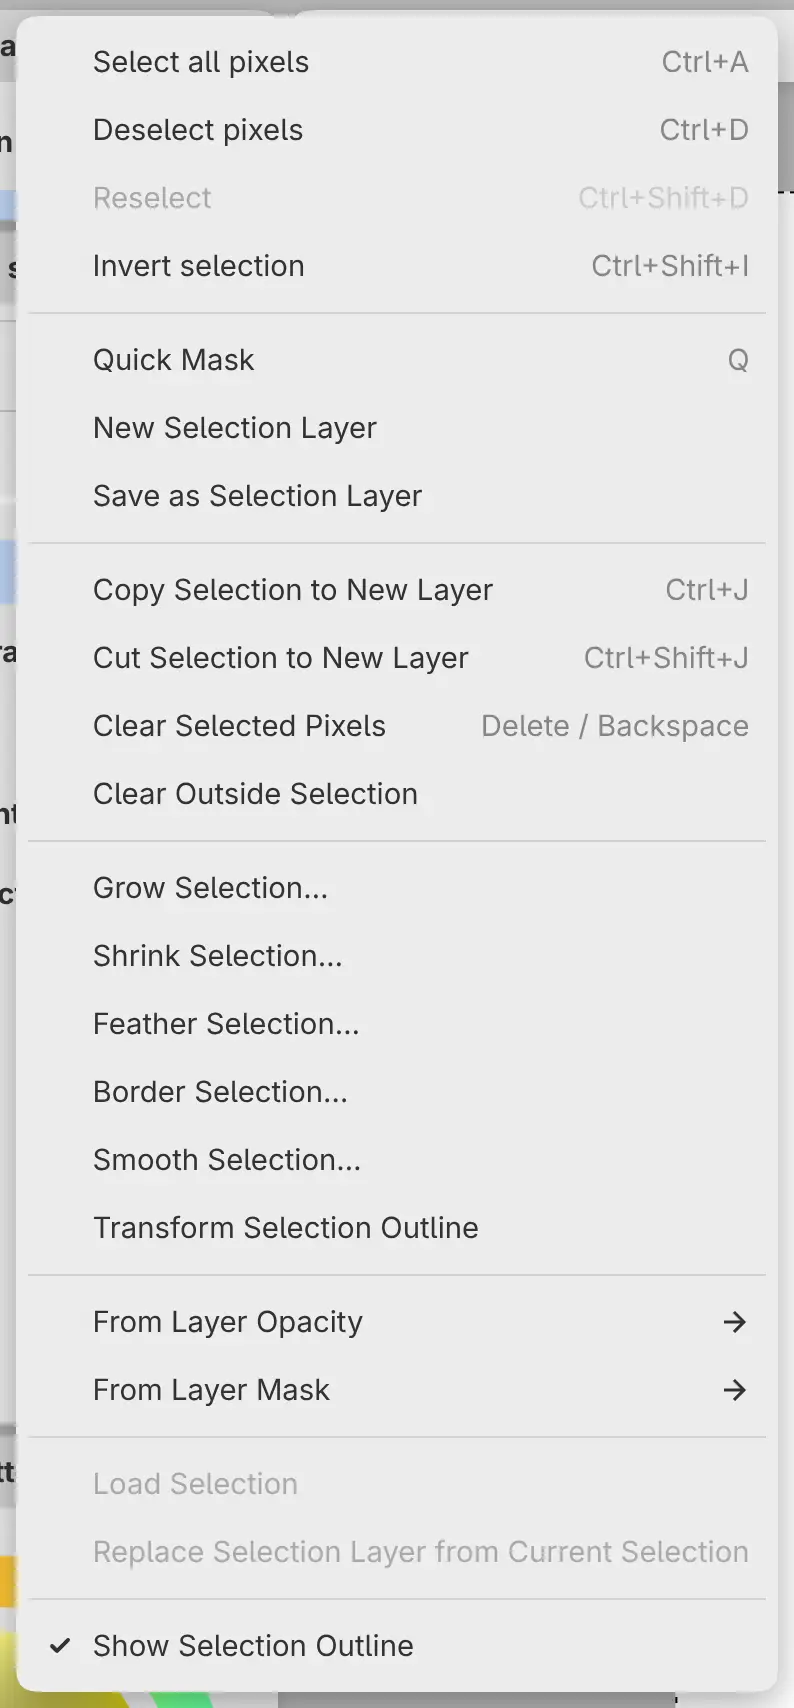
Select menu
You can also open the Select menu from More on the selection bar, and from Select below a selection tool’s settings in the Tool panel.
| Command | Does | Key |
|---|---|---|
| Select all pixels | Selects the whole canvas | Ctrl+A |
| Deselect pixels | Removes the selection, and ends Quick Mask or selection layer editing | Ctrl+D |
| Reselect | Restores the selection that the last change removed | Ctrl+Shift+D |
| Invert selection | Selects everything outside the selection | Ctrl+Shift+I |
| Show Selection Outline | Shows or hides the selection outline |
Reselect is available only while nothing is selected.
Hiding the selection outline keeps the selection. Show Selection Outline is also in the View menu.
Refining a selection
You can grow, shrink, feather, border or smooth a selection with a live preview.
Do one of the following:
- Choose Select > Grow Selection…, Shrink Selection…, Feather Selection…, Border Selection… or Smooth Selection….
- Select Refine on the selection bar and choose Grow…, Shrink…, Feather…, Border… or Smooth….
A panel with one value opens at the bottom of the canvas. To keep the result, select Apply or press Enter. Cancel and Escape restore the selection you had.
| Command | Value | Range | Default |
|---|---|---|---|
| Grow Selection… | Grow by | 1–128 px | 5 px |
| Shrink Selection… | Shrink by | 1–128 px | 5 px |
| Feather Selection… | Feather radius | 0.1–100 px | 5 px |
| Border Selection… | Border width | 1–128 px | 5 px |
| Smooth Selection… | Smooth radius | 1–64 px | 5 px |
Border Selection… replaces the selection with a band along its edge. Smoothing fills notches and removes spikes narrower than twice the radius, but doesn’t move edges that lie on the canvas border. Growing and shrinking keep soft edges soft.
In Quick Mask, these commands change the mask.
Transform Selection Outline
You can move, scale, rotate, skew or flip the selection outline without moving any pixels.
Do one of the following:
- Choose Select > Transform Selection Outline.
- Select Refine > Transform Outline on the selection bar.
The transform box appears with a canvas bar captioned “Transform Outline”. It works like Transform, except that Distort, Warp and Interpolation aren’t available.
Filling and clearing
- Fill selection fills the selected pixels of the active paint layer with the current color, at the brush’s opacity.
- Clear Selected Pixels erases the selected pixels of the active layer. Soft edges erase partly.
- Clear Outside Selection erases the pixels outside the selection.
Do one of the following:
- Choose the command from the Edit menu. The clear commands are also in the Select menu.
- Press Shift+Backspace to fill, or Delete or Backspace to clear the selected pixels.
- Select Fill, or Clear and a command, on the selection bar.
- In Paint, select Fill selection in the Commands toolbar.
- Open the layer’s menu and choose Pixel Selection > Fill Selection.
You can’t clear pixels in Quick Mask, on a mask, or on a layer with Alpha lock on.
Copying to a new layer
Copy Selection to New Layer copies the selected pixels of the active paint layer to a new layer directly above, in place. Cut Selection to New Layer also erases them from the original layer.
Do one of the following:
- Choose Select > Copy Selection to New Layer or Select > Cut Selection to New Layer.
- Press Ctrl+J to copy or Ctrl+Shift+J to cut.
- Select Copy to Layer on the selection bar and choose a command.
The new layer is named after the original, for example Ribbon copy, and keeps its opacity, visibility and blend mode. The selection is removed until you choose Reselect.
Without a selection, Copy Selection to New Layer duplicates the selected layers.
Masking a layer to the selection
You can add a mask to the active layer that shows only the selection.
Do one of the following:
- Open the layer’s menu and choose Mask > Mask: reveal selection, or Mask > Mask: hide selection to hide the selected area.
- Select Mask on the selection bar.
If the layer already has a mask, the selection replaces the existing mask. The selection is removed, and the mask opens for editing (see Masks).
Selections from layers
You can load a layer’s paint, its mask, or a selection layer as a selection.
Do one of the following:
- For a paint layer, choose an item from Select > From Layer Opacity: Select Layer Opacity, Add Opacity to Selection, Subtract Opacity from Selection or Intersect with Layer Opacity.
- For a layer with a mask, choose an item from Select > From Layer Mask: Load Mask as Selection, Add Mask to Selection, Subtract Mask from Selection or Intersect with Mask.
- Open the layer’s menu and choose the same items under Pixel Selection.
- Hold Ctrl and click the layer’s thumbnail in the Layers panel. Add Shift to add to the selection, Alt to subtract, or Shift+Alt to intersect.
Select > Load Selection loads selection layers.