Layers panel
The Layers panel lists the layers of the drawing, with the front layer at the top. The header shows the settings of the active layer.
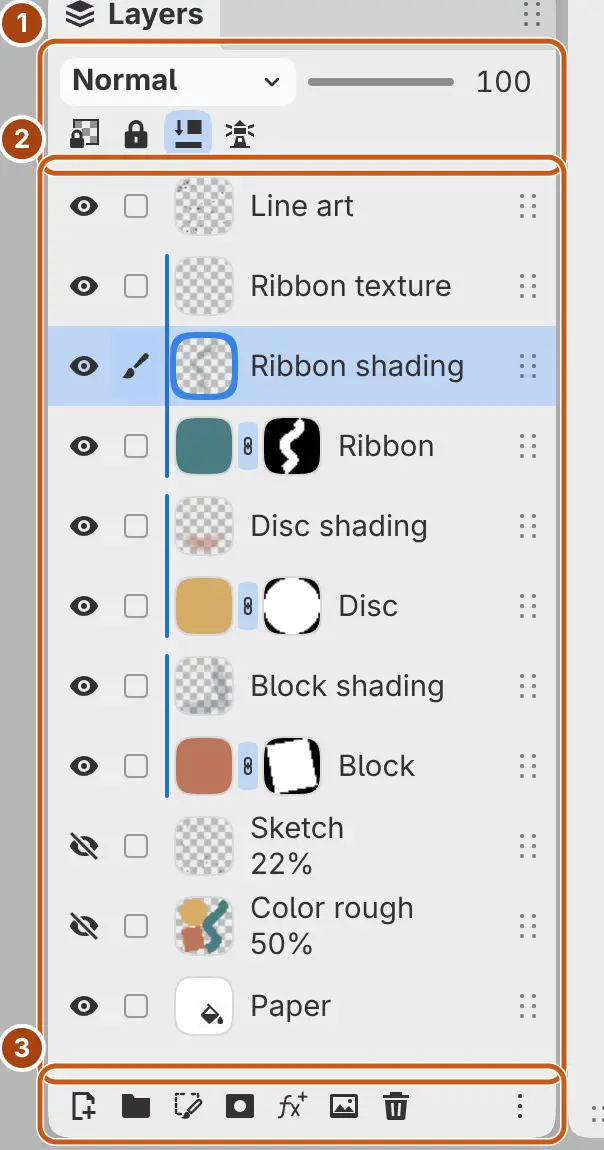
Opening the Layers panel
Do one of the following:
- Choose Window > Layers.
- In Paint, select Layers in the right column.
- In Sketch, select Layers panel in the title bar.
- Type “Layers panel” in command search.
In Photo, the panel is open in the right column.
Header
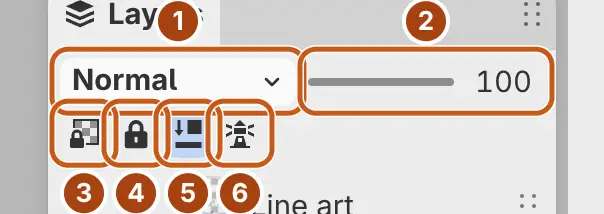
- Layer blend mode shows the current mode and opens the blend menu.
- Layer opacity, from 0 to 100. Drag the slider or type a value.
- Alpha lock.
- Lock editing.
- Clip to Layer Below. For a filter, the button reads Apply to layer or Apply to layers below (see How filters apply).
- Use selected layers as references. It reads Stop using this layer as a reference when the active layer is the only selected row and is already a reference.
A highlighted switch is on (see Layer settings). Layer blend mode and Layer opacity are unavailable for selection layers and locked layers.
Layer rows
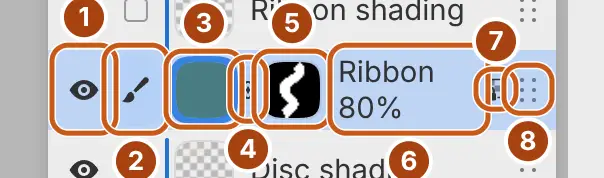
Layers in a group are indented below the group.
- The eye hides or shows the layer.
- The row button adds the row to the selection or removes it, without changing the active layer. It shows a brush on the layer that receives paint, a lighthouse on a reference layer, and a check mark on other selected rows.
- Select the thumbnail to paint on the layer’s pixels. On a group, it expands or collapses the group.
- On a layer with a mask, the link button sets whether the mask moves with the layer (Unlink mask from layer, Link mask to layer).
- Select the mask thumbnail to paint on the mask.
- The subtitle under the name shows the color mode, blend mode and opacity when they aren’t Full color, Normal and 100%, for example “Multiply · 60%”.
- A lock icon marks a locked layer, and an alpha lock icon marks a layer with Alpha lock on.
- Drag the grip to move the layer.
Select a row to make it the active layer and the only selected row. Layer types shows the thumbnail of each type.
Ctrl+click a paint layer’s thumbnail to load its opacity as a selection, or the mask thumbnail to load the mask. Add Shift to add to the selection, Alt to subtract from it, or Shift+Alt to intersect with it.
Row indicators
- An outline around the thumbnail or the mask thumbnail marks what brushes paint on.
- A rail to the left of the thumbnails joins clipped layers to their base.
- A chain link between two thumbnails joins an attached filter to the row below it.
- A faded, crossed-out eye marks a layer that is turned on but hidden by its group, or an attached filter whose layer is hidden.
- A faded mask thumbnail marks a disabled mask.
- While Quick Mask is on, a Quick Mask row appears at the top.
Footer buttons
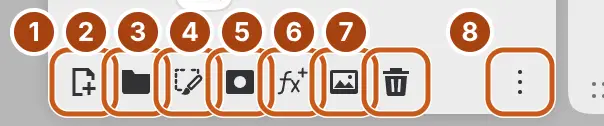
- New layer adds a paint layer.
- New group. With several rows selected, it groups them.
- New Selection Layer (see Selection layers).
- Add mask.
- Add Filter attaches a filter to the active layer.
- Import Image as Layer…
- Delete selected layers.
- Layer actions opens the layer menu of the active layer.
A button is unavailable when its action doesn’t apply to the active layer, for example Add mask on a locked layer (see Working with layers).
Swipes and holds
With a pen or a finger:
- Swipe a row to the left to show Delete at its right end. Select Delete to delete the layer, or swipe right to hide the button.
- Swipe a paint layer to the right to turn Alpha lock on or off.
- Swipe a group to the right to turn Pass Through on or off.
- Hold a row to open its layer menu. Move without lifting to drag the row instead.
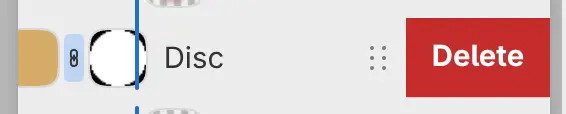
A short swipe changes nothing. Swipes don’t work with a mouse, on the grip, or on locked layers.
Layer menu
You can open a menu of commands for each layer.
Do one of the following:
- Open the Layer menu. It holds the menu of the active layer, without Add Filter.
- Right-click a row, or hold it with a pen or a finger.
- Select Layer actions at the bottom of the panel.
- With a row focused, press Shift+F10 or the Menu key.
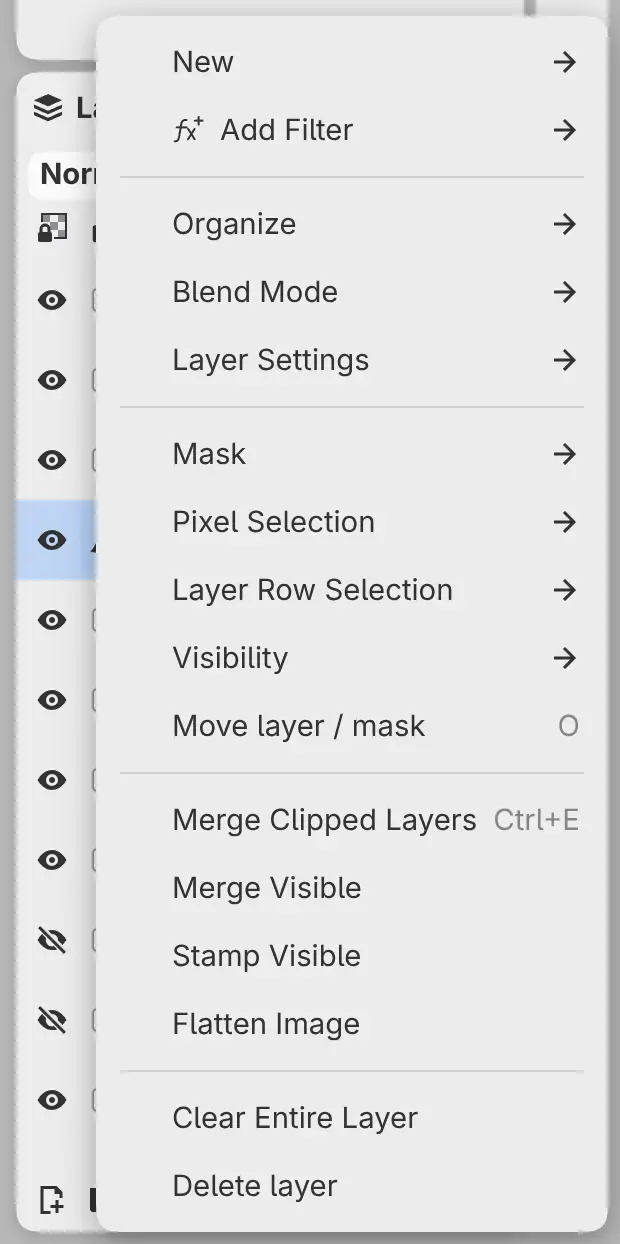
| Item | Contents |
|---|---|
| New | New layer, New clipping layer, New group, Solid Color Fill, Gradient Fill, New Dodge & Burn Layer, Copy Selection to New Layer, Cut Selection to New Layer |
| Add Filter | Filters to attach to the layer, by category |
| Organize | Rename layer…, Duplicate, Group selected layers, and Ungroup for a group |
| Blend Mode | Every blend mode |
| Layer Settings | The layer settings |
| Mask | The mask commands |
| Pixel Selection | Select Layer Opacity, Add Opacity to Selection, Subtract Opacity from Selection, Intersect with Layer Opacity, Fill Selection, Invert Selection, Deselect Pixels |
| Layer Row Selection | Select All Layer Rows, Clear Layer Row Selection |
| Visibility | Show layer, Show layer and parent groups, Isolate selected layers, Show all layers |
| Move layer / mask | Selects the Operation tool |
| Merge Down, Merge Visible, Stamp Visible, Flatten Image | See Merging layers |
| Clear Entire Layer, Delete layer | Clear Entire Layer appears on paint layers only |
Opening the menu of a row makes that layer active. A group’s menu starts with New Selection Layer in Group… and Save Current Selection in Group…. Selection layers have a menu of their own (see Layer types). Right-click or hold the mask thumbnail to open the mask menu.